Nov 5, 2012

The pain of Ubuntu 12.10

The day when 12.10 was released the download page of Ubuntu showed "avoid the pain of windows". I upgraded from 12.04 which is a long term support thinking that there would be new features and good  performance. Just like all other short term support versions, 12.10 is buggy and the unity interface is very slow compared to 12.04. When I typed in the unity dash, it took couple of seconds for the characters to appear. The response to user action is not instantaneous.

Ubuntu 12.10 was released just a few days before Microsoft's windows 8 release. It  consumed a lot of resources and it overheated my notebook in spite of having a dedicated nvidia graphics card, 4GB ram and a Intel core 2 duo processor clocking at 2.1Ghz. First I thought this may be because of the graphics driver. But even after updating the drivers, the performance was not good. Ubuntu has discontinued the Ubuntu 2d, which is visually similar to Ubuntu unity but technically dissimilar  The reason Canonical cited was that lot of computer hardware already have the capability to run Unity 3d. But the reality is even a dual core processor cannot handle the unity 3d graphics. 

The new feature that has been introduced with 12.10 is that the unity lens, which integrated the web search with desktop applications search. The unity search now includes results from amazon, flicker, Google drive documents. 


Canonical should avoid the pain of Ubuntu/linux than pain of windows so that it can be good competitor to Windows 

Sep 9, 2012

Fritzing

It has been a great struggle to to do hobby electronics projects when I was studying engineering as there was no single good solution for designing schematics, PCB designing and prototyping. I had to switch between different tools to draw schematics and design PCB. But none seemed to be a good fit for a newbie to learn designing and prototyping. I tried various tools like eagle, procad and other PCB designing tools but they were too complex to learn and for a newbie to get acquainted with EDA tools. Recently I stumbled upon a this nice initiative called Fritzing.


Fritzing is an open-source open-source initiative to support designers, artists, researchers and hobbyists to work creatively with interactive electronics. Using tool you can draw schematics, designing PCBs, teach electronics, prototyping, and share your hobby projects with others. Fritzing is being developed by researchers in the Interaction Design Lab at the University of Applied Sciences Potsdam, Germany.

The important feature of Fritzing is that you can switch between the three views: breadboard view, Schematic and PCB view. editing in view will automatically reflect the changes in other view as well. Fritzing will simply the whole process of simple electronic projects development. It is good tool for newbies who want to learn Electronic Design Automation Tools (EDA).

To download Fritzing visit http://fritzing.org/welcome/

Apr 2, 2012

Cinnamon theme tutorial (part 1)

What is cinnamon desktop?
Cinnamon is the fork of gnome 3 shell. Cinnamon brings the advanced features of gnome 3 and combines it with the traditional gnome 2x desktop to give user a pretty descent desktop experience. Cinnamon started with Linux Mint but it is also available for fedora, Ubuntu and other Linux distributions also. 

For more on cinnamon desktop visit http://cinnamon.linuxmint.com/
The cinnamon desktop can be customized with many applets and extensions.

The theme:
Cinnamon theme is made up of some images and CSS code. Since CSS is widely used for the web development anyone who has a knowledge of CSS can easily learn and design the cinnamon theme. All you need is to have some basic understanding of CSS.

I Assume that you are running Linux Mint on your machine.

The default theme of cinnamon is located at  /usr/share/cinnamon/theme.

Open the file manager and browse to the above mentioned location. You will see some .svg,  .png images and cinnamon.css file. 

The .svg and .png images are used as icons. The customization is done by editing the cinnamon.css file. The cinnamon.css file will serve as the template for our new themes that we're going to create.

Getting started:
  1. Go to your home folder
  2. Create a directory “cinnmonthemes
  3. Create a directory “firsttheme” inside of “cinnamonthemes" which you created in the 2nd step.
  4. Create a directory "cinnamon" inside firsttheme.
  5. Copy all the content from /usr/share/cinnamon/theme into cinnamonthemes/firsttheme/cinnamon/
Now that you have copied the default theme to the cinnmonthemes directory, we'll work on the themes in this directory for our tutorial

Installing the theme:
Theme should be installed in the .themes directory in the home folder. The .themes directory is hidden by default. To view it, go to your home directory, click view and select show hidden files option. Folders starting the dot are hidden folders. Look for .themes folder. If .themes folder is not found, create it.

Now copy the firsttheme directory and paste it in the .themes directory. This completes the installation part. Now to apply your theme you need restart the shell. Press Alt+F2 and type r and hit enter. This will restart the shell. Now your theme is ready for applying. Launch cinnamon-settings from the popup menu, click on the themes and select firsttheme. Your theme is now applied.

The firsttheme is similar to the default theme and you'll not find any differences because you have not made any changes to the theme. Till now all you have done is just copied the default theme and  renamed it as firsttheme. 

Editing the theme:

The wow starts now!

First let's start by editing the panel background color. The panel is where the menu, running apps, date time, network appplets etc,. reside. To change the background of the panel open the cinnamon.css file present in the .themes/firsttheme/cinnamon/ with gedit or any text editor that is convenient to you and search for #panel and look for this section:

#panel {
color: #ffffff;
background-color: #555555;
font-size: 8.5pt;
font-weight: normal;
height: 25px;
}

the command background-color: #555555 defines the panel's background color. To change the panel background to red change the value #555555 to  #FF0013.

Save the changes you have made to the file. Restart the shell by pressing Alt+F2, type 'r' and hit enter. This will restart the shell and the panel background changes to red.

Hope you enjoyed this tutorial. In the next tutorial we'll learn how to change the popup menu background color and border color.

Apr 1, 2012

cinnamon theme: Funny Animal

Desktop 
Funny animal is my second Cinnamon theme. Funny Animal is simple theme with green background for panel and popup menu. The font of the panel is  a little bigger. and the border of the popup is red. The current day in the calender is highlighted in red circle. 
popup
calendar
Alttab popup

Mar 25, 2012

cssviewer

cssviewer is a simple add-on/extension for Firefox and chrome browser to view the CSS properties of a webpage or a blog. Though chromium browser has its own inbuilt 'inspect element' tool to view the html and CSS properties, it is not easy and simple to use. cssviewer is simple and easy. Just hove the mouse over the web page element and it will show all the properties of the element. You can download the Firefox add-on at https://addons.mozilla.org/en-US/firefox/addon/cssviewer/  chromium users can download the extension from https://chrome.google.com/webstore/detail/ggfgijbpiheegefliciemofobhmofgce

cssviewer simplifies the task of analyzing a webpage for the CSS properties. This tool is very useful for web designers and for those who want to learn CSS and bloggers who wish to customize themes. Below is the screen shot of cssviewer showing the CSS properties of my blog description element. The element is highlighted in red color dashed line and the properties are shown in the floating window above the blog.

Mar 13, 2012

MIT App Inventor

After being abandoned by Google and being made it available to the open source community, the App Inventor for android is now supported by MIT. It will now be called as MIT APP Inventor. As of now it is in the beta stage. App inventor offers a simple WYSIWYG interface to develop application for android by just dragging and dropping the programming blocks.
You can try MIT app inventor at http://appinventor.mit.edu/. You can use your google account to sign up for the MIT App Inventor.

Mar 8, 2012

NVIDIA joins The Linux Foundation

NVIDIA, the leading graphic chip maker and best known for its GeForce chipsets has joined the linux foundation to strengthen it's relationship with the linux and open source community. Till now NVIDIA has been offering the closed source driver support to the linux community. This has been very difficult for the linux community to contribute enhancements and bug fixes to the nividia family of graphic chips. With the joining of Nvidia, all the three major chip makers--AMD Graphics, NVIDIA and Intel–are now backing Linux.


Scott Pritchett, NVIDIA’s VP of Linux Platform Software, said in a statement that the company “is strongly committed to enabling world-class experiences and innovation with our GPU and mobile products. Membership in The Linux Foundation will accelerate our collaboration with the organizations and individuals instrumental in shaping the future of Linux, enabling a great experience for users and developers of Linux,”

Mar 5, 2012

Wammu

This is an era of smart phones but still some of us still use the not so smart phones which have the basic features that a mobile phones should have. Some people use the mobiles with minimal features because they don't want their lives to be controlled by technology. They have some kind of allergy towards technology.They don't like carrying a brick sized mobile smart phone in their pockets. They are comfortable with communicating and browsing on the PCs. Yet sometimes they feel that the it would be better if the cellphone can be connected to the PC

some people work on computer for hours and when someone calls or sms on the mobile frequently it can be very irritating and disturbing switching between the mobile and PC. In those situations you might have felt the need for smsing and calling from the PC.

One more thing that is irritating with mobiles is the contacts and sms stored. Every now and then people change their mobiles and switch brands and you have to transfer your contacts to your new mobile. Saving each contact and sms manually is a daunting task. Although most cellphone vendors provide the software mobile management software for the mobile they are limited in features and are available only for only windows OS. 


Wammu:
One solution to the above mentions scenarios is the cell phone management tool called Wammu. Wammu is a program to manage data in your cell phone such as contacts, calendar or messages. It is a GTK+ GUI application built on Gammu library, which provides abstraction layer to work with different cell phones from different vendors (including Nokia, Sony-Ericsson, Motorola, Samsung, Siemens, Huawei, LG and others). Using wammu you can send sms,  retrieve calls, contacts, sms, calenders both from the cell phone memory and SIM card.

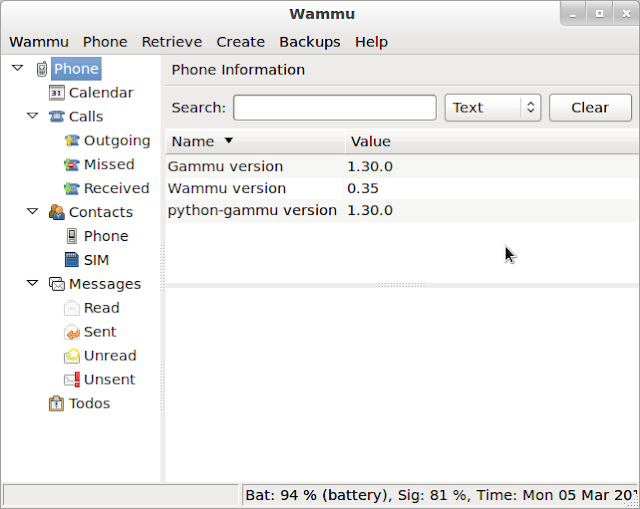
Since wammu is a GTK  application  it is would be available for any Debian based distribution. Check the software center or synaptic manager to install the wammu. The interface of the wammu is clean with a side pane containing the options to browser the different features of the mobile. Once installed, launch the wammu application. At first time launch it will not show your cellphone. You need to configure the wammu to detect the phone.


Configuring wammu:

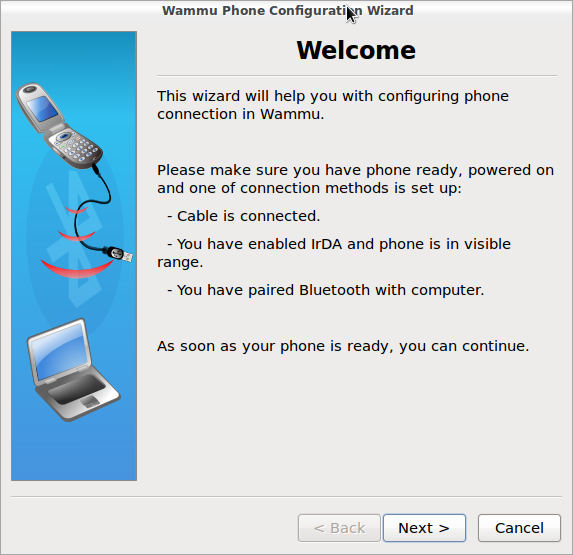
Click on the wammu menu in the menu bar and select phone wizard. This will show you a welcome dialog window with some instructions to check before configuring the phone. Connect your cell phone to the PC using USB cable or serial cable or Bluetooth. Once ready, click the next button and it will show another dialog to choose the configuration style. There are three configuration styles: Guided configuration, automatically search for phone and manual configuration. If you have no idea what to choose, you can play safe by choosing the auto configuration option and click next to proceed to next dialog, connection type. In this connection type there are four ways to connect your mobile. USB, Bluetooth, IrDA and serial cable. You can choose to search all the available connection types. Once done click next. Wammu will search for the cellphone within few seconds. After the search is complete, Wammu will display your cellphone. Select cellphone and click OK and proceed further to complete testing.


Now click on the phone menu in the menu bar and select connect, In few seconds wammu will be connected to the cellphone and status message at the bottom right changes from disconnected to battery charge status and signal strength of the network. Now the cellphone is connected and you can retrieve information from cell phone.

Click Retrieve menu from the menu bar and select info. This will show the information about the phone hardware profile. and SIM information.

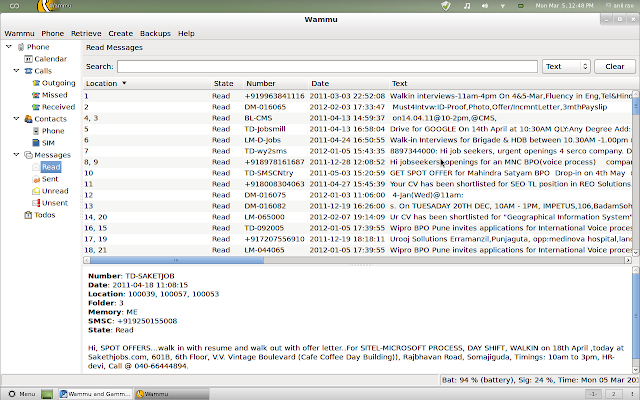
The retrieve menu has options to retrieve the messages, call log, contacts, calender and to-dos.

The above screen shot shows the retrieved sms. Right clicking on the message will give options to reply, call the sender, save contact and backup etc.

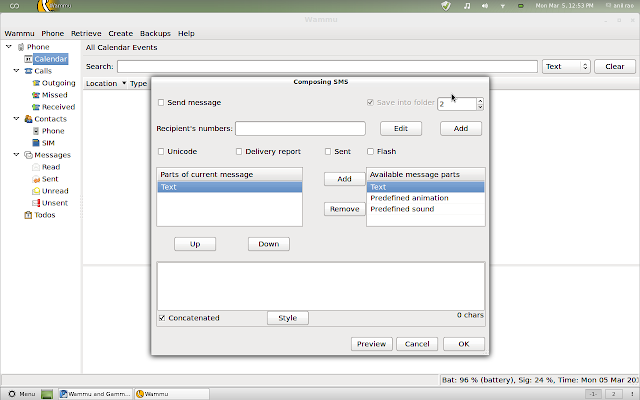
The create menu contains the options to create a new contact, message, calender event and to-do.
Click the send message option to send new sms and this will bring up the message dialog. Above screen shot is the message dialog.

The backup menu contains options to backup the cellphone data. you can also back up the messages and contacts on the PC and also you can forward the data to your email.

For more info on wammu visit http://wammu.eu/


Feb 16, 2012

Free FBReader for Android updated with Slovoed dictionary support

Paragon Software Group, the leading developer of multi-platform software applications for mobiles and computers, and Geometer Plus LLC, a developer of free open-source e-book reader application FBReader, announce that FBReader now supports the latest series of Slovoed multilingual ‘talking’ premium content dictionaries on Android devices to provide immediate translations and definitions of e-book text without the need to switch applications or access the Internet. By installing FBReader, users of Slovoed dictionaries, available in more than 29 world languages, can enjoy the most comfortable in-app translation from any book or document in EPUB, OEB, FB2 (.zip), mobipocket (mobi), RTF or plain-text format.

More than 100 Slovoed dictionaries offer original premium content directly from the world’s top publishers, such as Berlitz, Merriam-Webster, Duden, PONS, Langenscheidt, Le Robert, and many others, in combinations of 29 of the world’s most spoken languages. The newest version of Slovoed dictionaries integrates next-generation Google features, such as Google Goggles and Google Voice Search, as well as Paragon’s own PenReader handwriting recognition tool, which allows users to enter search text in their own handwriting. Highly complex search features replace tedious single-word searches to allow multi-word and full-sentence translation. Enhanced customization features – including three-color themes and scalable font size – ensure total visual comfort.

FBReader features:
  • Instant access to the most popular Internet libraries and online bookshops directly from FBReader – review and download books without leaving the reader app!
  • Built-in file manager allows you to organize your personal library on any Android mobile device (including, Honeycomb tablets) by title, author, genre or series, and store your entire library on one tiny SD card.
  • Available in 20 languages with hyphenation patterns for 16 languages.
  • Supports external TrueType/OpenType fonts.
  • Open-source (GPL).
  • Write your own FBReader app plug-ins with the API.
  • Several popular English, French, Russian, Chinese and Polish libraries are included. Custom OPDS catalogs are also supported.

Slovoed 2.8 features:

  • NEW! Search by voice. Speak your queries instead of typing in words using Google Voice recognition service. If Voice Search input is not available on the device, Slovoed will offer to install the application automatically by searching the Android Market (Search in Russian language is available for OS 2.2 and higher).
  • NEW! Google Goggles integration. Take a picture of the text for translation, add it to the clipboard and translate it with Google Goggles.
  • NEW! PenReader handwriting recognition integration as a system input method. Recognition accuracy increases through the use of Slovoed dictionaries.
  • NEW! Multi-word translations. Translate all clipboard contents – whether one word or several words at a time.
  • NEW! Easy copy-and-paste functions. Copy an unknown word or phrase from an active application (web browser, email) to the clipboard, then switch back to the dictionary for automatic translation.
  • NEW! Enhanced customization options allow you to choose background color. Black, white and sepia themes are available.
  • NEW! Enlarge or reduce font size for your comfort.
  • NEW! Dictionary installation on SD card to save space on your device (Available for OS 2.2 and higher).
  • NEW! Install a Word-of-the-Day widget on your Home Screen directly from the application.
  • NEW! Manage Word-of-the-Day settings: select dictionary direction, font size and update period (manual or automatic). 
Slovoed multilingual dictionaries for Android contain detailed word translations with usage and sound samples, transcription, grammatical information, and color markup to satisfy all learning needs. Slovoed Deluxe includes the fullest and most detailed translation articles with usage and sound samples, synonyms and antonyms, references and transcriptions, and other important information – an excellent solution for professional linguists, translators and advanced language learners. Slovoed Classic includes a considerable number of translations; extended dictionary articles with basic references, and is a comprehensive assistant for business, travel and study. Slovoed Compact includes the most common translations with clear, concise definitions, occupies minimal memory space on your device, and can be useful for introduction to a new foreign language.

Requirements: Android OS 1.5 and above; certain features require OS 2.2 and higher.

Availability: Slovoed Compact for Android is available for $11,99 USD or 7,82 GBP (9,99 EURO) by searching “slovoed” in the Android Market. Slovoed Classic for Android is available for $19.99 USD or 13,04 GBP (14,99 EURO) by searching “slovoed” in the Android Market. Slovoed Deluxe for Android is available for $24.99 or 19,54 GBP (19,99 EURO) by searching “slovoed” in the Android Market.

Jan 17, 2012

Create your own epub e-books using sigil

Now-a-days most of the books are available in digital format. The books in digital format are called e-books. Thanks to the tablet PCs, e-book readers and smart phones. The extraordinary growth of the these hand held devices has brought a revolution in the book publishing industry. The authors and publishers should adapt to this change to survive in this stiff competitive environment. While such a revolution brings a lot of competition, it also enables the authors and publishers to reach out to a wide variety of readers. The readers have a lot of choice and can carry the entire library in a small hand held device. From the environmental point to view this is a very good trend as it saves a lot of paper.

In this article I'll discuss about the a tool called Sigil, a WYSIWYG e-book creator. This tool is very useful if you'd like to author an e-book and publish on the web. Sigil will help in creating your e-book in the popular e-book format called epub.

ePub is the short form for electronic publication. It is a free and open e-book standard. The main feature of the epub is that the text display can be optimized for a particular display of the device used to read the epub e-books. This makes the work of the authors and publishers easy. The authors can concentrate on the content of the book without worrying about how it will be displayed.

Sigil

Sigil is an open source WYSIWYG tool to create e-books in epub format. It is available for windows, linux and Mac. Sigil makes the herculean task of writing an e-book easy. The table of contents can be created  using the headings and sub headings by clicking the 'Generate TOC from headings' at the bottom right of the window.The interface is clean and tidy. 

To download Sigil visit http://code.google.com/p/sigil/


The editing can be done in three modes:
Book view
code view
split view

In book view mode the editing is same as it will be visible to the user on a e-book reader. With code view we can edit the content programatically. This is mainly recommended for advanced users who have knowledge about html and css.The split view mode will show both the book view and the code view. Selecting split view will add the code view window at the bottom of the window. 

There are also variety of formatting styles to make the e-book readable and customization. Once you have completed writing your e-book you can also validate if your ebook complies with the epub standard. You can do this by selecting the 'validate Epub'   option from the tools menu. There is also an option in tools menu to edit the metadata. This meta data includes the author of the book, tags, categories, publisher, edition of the book. copyrights etc,.
One you have done with your e-book you can sell your books on lulu.com for kindle direct publishing or any other e-book distributor.

Jan 11, 2012

Ubuntu TV

All these years the television has been just a an average electronic device with not much choice for the viewers to find entertainment, record and share your favorite shows. The wait is finallly over. Canoical, the company that spear headed the Ubuntu OS is all set to compete with Google and Apple by launching the Ubuntu TV. The canonical showcased the latest venture during the Consumer Electronics Show (CES), LasVegas.


Canonical claims that Beautiful simplicity is the driving force behind Ubuntu TV. It integrates broadcast, time shift, online box office, personal cloud, apps and disk media experiences - all without wires, connectors or more boxes. It really is just the TV.


The important feature of the Ubuntu TV is the Second screen experience in which users would like to know more information about the content they are watching, but without interfering with the content on the screen. Ubuntu TV is designed to work with your phones, tablets or laptops via apps that talk to the television.


Ubuntu TV makes users find entertainment easy. Ubuntu TV benefits from the comprehensive hardware support that's always been a hallmark of Ubuntu for PCs.


For more information visit http://www.ubuntu.com/tv